Stick removal, removed doors, door work, microbubble | 1.1.2021
It might seem like I haven't done much, but most of the days not spent working on the plane are working on the avionics communication wiring diagram. More to come on that.
Long day. Started by organizing the to-do list and getting a good grasp on the stuff left to do. Quickly move on to removing the old stick grip.
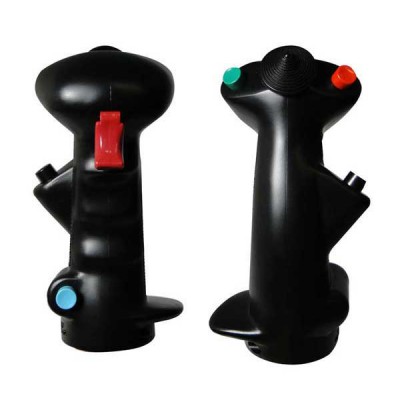
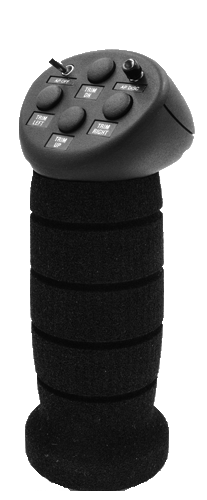
The previous owners had installed an Infinity military style grip, which while loved by a lot of people, isn't really our aesthetic. It's a bit busy to us. Instead, I (as the one who has to fly this thing ;)) decided that I wanted to go with a Ray Allen grip.
 |
| Infinity grip |
 |
| Ray Allen G407 |
Since my Ray Allen had come in, I figured I'd remove the old grip to make way for the new one. This started with removing the steel stick from the control tubes. Unfortunately, as with all things, this turned into another thing I need to purchase. Because of the angle of the Infinity grip, the steel stick had been cut down. The length it was cut to is *just* not long enough to really properly hold the Ray Allen grip. This will get added to the order list.
 |
| This is the too-short control stick. |
After that was done, Emily and I removed both doors from the plane to do some work on them. I also noticed that the screw holes in the fuselage that held the doors on weren't quite flush, so I countersunk those more.
 |
| Henry helping with the doors. :) |
Started the work on the doors by duct-taping the interior windows in prep for micro around the perimeter. This is mostly done to fair the window in, but it also helps hold the window in place. Side note: I have been absolutely dreading specifically this one step in building this plane. I knew this would be difficult, I knew that it wouldn't come out perfect, and I knew this would be a terrible place to sand when it didn't come out perfect. (Editor's note: I was right on all points).
 |
| Windows duct taped. |
Next, I relieved the edge around the door strake extension to make room for a piece of foam to enclose this area. Again, I did this with a dremel end mill type bit, worked great. Final pass was with a dremel drum sanding wheel to clean things up.
 |
| Left side carved out (green/blue foam showing), right side still needs cut out. |
 |
| Foam cut to shape. The opposite side of this foam has already been glassed. |
Emily and I then measured the interior and then purchased all of the interior materials. We'd already spent a ton of time debating the right colors. We're still not sure about the colors, but at some point you need to make a decision, so we ordered them. Worst case scenario is that we hate them and we get to re-upholster the plane at a later date.
After all the interior materials were ordered, I went back out to the garage and microbubbled all the stuff from the past week or so; the windows, the pitot mount, the canard tips, etc. I also installed the foam into the ends of the door strake extensions with microglass/cabo in a few spots. The rest of the gap will get filled with microbubble after the microglass cures.
 |
| See how not smooth this is? I have to sand all of this later, yay... |
 |
| Microbubble fairing this in; this will get sanded nice and flat. |
That's all for now!
- Jeff
Comments
Post a Comment