Posts

Showing posts from February, 2021

Install some intake tubes/exhaust, prop extension | 2.22.2021

Image
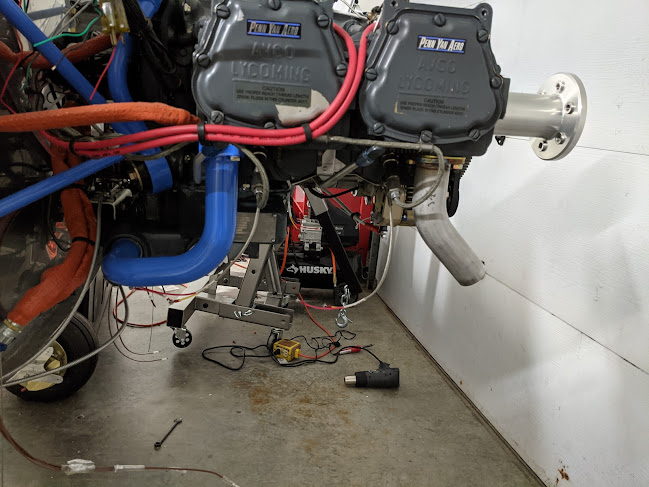
Since the paint cured overnight, I installed the two intake tubes that had been painted. I also installed the exhaust pipes that wouldn't get in the way of installing the other two intake tubes when they get back from being welded up. A speck of color!   Once those were bolted up and torqued to spec, Emily and I got the prop extension, starter ring gear, and alternator belt hooked up again (hopefully for the last time). I then safety wired these bolts, because I don't see them coming off again at this point. - Jeff

Blasted intake tubes, painted parts | 2.20.2021 - 2.21.2021

Image
Sand blasted the nose wheel rim, fork, and two of the intake tubes for the engine. The other two intake tubes got dropped off to a more competent welder. :) Freshly blasted. I then took a *really* long time cleaning these out and prepping everything for paint. Since none of this is critical or really even has to look good from 10 ft, I rattle-canned it. These all use the same blue as the engine mount. May as well get more creative than "Lycoming Gray". Convenient outdoor painting rack. Convenient indoor drying rack. The finish on all of these came out actually way better than I could have hoped. Probably because I pre-heated both the parts and the spray can. Well, that's it for now! - Jeff

Trim door strake extensions, engine plenum, seat foam | 2.18.2021

Image
Quick one: just trimmed off the excess from the door strake extensions and the engine plenum halves. Looking good. Nice and flush Much better now. Can do more work on these eventually. Emily and I also worked on cutting some seat foam for the seat backs. Needs sanded, but otherwise this is the rough shape. That's it for now! - Jeff

Nose gear safety stick, remove nose wheel | 2.17.2021

Image
I've been putting this one off for a while for some reason. Finally got around to working on the nose gear safety stick. In short: this is a "stick" that goes through the keel so that if you were to use the gravity drop gear fail-safe, you can ensure the the nose gear is locked and will stay over-center. Stick the "stick" in one side, pry up on the gear linkage (if not all the way up), then slide it over through the other side to hold the gear up over center. Started by locating the hole. I actually used a flashlight for this. Held the small round flashlight in the inside of the keel and then marked the center of the light. Adjusted for thickness of the flashlight vs the material and drilled a hole slightly above this point. Once the hole was drilled, I filed it to fit the 3/4" 4130 steel tubing that I'm using for this. The book calls for a 1" wooden dowel, but after talking with Scott Swing, a piece of steel tubing is often used in place of this.

Wiring harness table, SDS coil pack install | 2.16.2021

Image
Well, it's just about time to start fabricating the wiring harness. There's really not a ton of great info out there about this (avionics in general), so I based this idea off a post on the Van's Air Force forums. For some reason I can't find it now to link it. Basically, the idea is that you take measurements in the plane, then transfer these measurements to a work surface. The cables are then pulled along the work surface to the end point for that electrical "thing" and held in place. Pull all the cables to everything and you basically have a complete harness. I modified this idea a bit by mocking up the panel and sub-panel on the table as they sit in the plane. This would eliminate having to measure (and get right!) the majority of the avionics. I can just pull wires to where things sit. (I hope this works out, but have no idea if it will or not. Probably don't use this idea until a later post where it works.) Steve (Emily's dad) and I started by me

Firewall aft cabling cleanup | 2.14.2021

Image
Worked on routing all of the wiring aft of the firewall (engine side). All the wires got routed through adel clamps and out of the way of anything else. I came out of the duct, then up and over to the pilot's side for the sensors over there. Once all wiring is 100% done, will clean up/grommet the hole Pilot's side wires. I also pulled some wiring for the SDS through the chase/plenum, but no pictures of that. - Jeff

Overhead panel finished, mock up panel and sub-panel outside of plane, wiring | 2.13.2021

Image
Finished the overhead panel today! Started by laying out the holes for the switches on sticky paper and then stuck that to the panel. Much like how I did the main panel. Cut those holes out with a jigsaw and finished with a file. Holes cut/drilled. This was then covered with wrap just like the panel. That stuff does crazy well on curves. Starting to attach. Finished product. This looks awesome, if I do say so myself. After it was wrapped and the switches were in, I worked on wiring up the lamp circuit to light the switches up. I also soldered pigtails onto the starter switch. That middle one isn't nearly as tight as this picture makes it look. Next, Emily and I worked on mocking the panel and subpanel up on the table. The intent is that these are exactly as they sit in the plane so that I can wire the avionics without needing to measure. Did this out of some wood that I had, and then screwed everything down to the table. Held up with some straps and wood. Luckily 3" was the pe

Wiring harness measuring, spark plug harness complete, subpanel fuse box install | 2.10.2021

Image
Finished up the fabrication and install work on the spark plug harness for the SDS. Below is the best routing that I could come up with that didn't interfere with the engine cooling plenum or anything else. Everything is neatly ziptied and awaiting the install of the coil pack (waiting on new magneto studs). New cables in red. As I was finishing that up, Emily's dad Steve showed up to help me measure for the wiring harness. We started out by placing all the remote mount instruments in place on the sub-panel and making sure everything fit. Radio, transponder, GAD29, and dimmer stacked Other side with fuse boxes and battery back up. We were going to measure from everything to everything else, but we realized that we could remove both the panel and subpanel from the plane and mock it up on the avionics table just as it sits in the plane, so we really only needed to measure anything *not* on the panel or sub-panel, which made things much easier. Here's Steve writing up the leng

Fuel pump hose, engine ground, fuel shutoff safety wire, control stick | 2.9.2021

Image
Started the night by fabricating a new hose for the engine driven fuel pump to fuel servo connection. This is a really tight fit, and I've tried like 4 different things here, this is the best so far, and what I'm going with. 45s resulted in too tight of a bend in places. Hose with fire sleeve Hose installed.  I then fabricated an engine ground cable. Going into the cabin to meet up with the ground block there and the 2ga cable back to the battery. And here it is on the drilled and tapped engine spot. After that was done, I rigged up a way to safety wire the fuel shutoff valve open. I didn't want to safety around the aluminum fuel line because the stainless safety wire would wear through. So what I did was fasten an adel clamp around the fuel line with a drilled head AN3 bolt. This will give me a place to safety to without wearing anything. I drilled a hole through the fuel shutoff handle, and this will get wired to the bolt head when it's time for that. It's on my &

Instrument install, SDS hall sensor install | 2.4.2021 - 2.6.2021

Image
A long awaited day has finally arrived. We're going to start installing instruments into the panel. I thought about a few different ways of handling the panel covering, and decided on vinyl car wrap. It's easy, durable, and should cover minor imperfections. I can also get it in a sweet matte black. Blank panel on the table, and the avionics table mess. :) This stuff goes on really easy, then gets trimmed. Tons of videos on how to do this so I won't get into it. Unstretched, just lightly sitting on there. Cutting out the holes. Once it was wrapped we started installing instruments, switches, etc. Beautiful switches The SDS head unit doesn't have anything backing the gaps around the edges where it gets installed, so wed used vinyl to cover the tiny gaps so no light comes through. And here's what the end result looks like with everything installed. Well, everything except the GPS175 that slides into that empty slot. We still need to buy that... There's also room be

Engine plenum, fuel pump install | 2.2.2021 - 2.3.2021

Image
Started the steps to finishing the engine plenum. Fit the plenum to the engine with a file until everything sat where I wanted it. I then duct-taped the engine to protect it where I would be doing layups. Engine taped up.  The plenums were then sanded and fit on the engine. I then did layups on the top and sides of the plenums to act as a flange for securing them together and to better fit the plenum to the complex sides of the engine. All of this will be trimmed. The next day, I removed the plenum halves from the engine and set them aside to cure. I also installed the fuel pump and fuel filter to the firewall and routed the hose up to the mechanical fuel pump. That's it! - Jeff