Posts

Showing posts from August, 2020

Mounting Wing 8.31.2020

Image
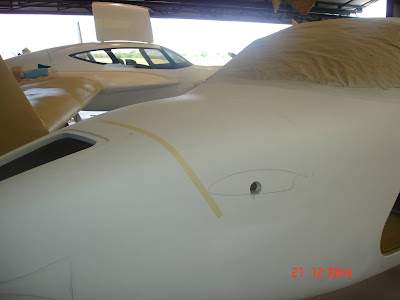
 526EJ Build Log August 31, 2020     We spent the 30th organizing the garage because we were starting to get a little annoyed with all the stuff in the way and since we are going to start doing work on the plane rather than just verifying the existing build, we wanted to take inventory and get an idea of where everything we have is located. We also wanted to bolt the wing on to check canard incidence, so we needed to make space.     On the 31st we mounted the right wing in the garage. It just barely fit, and was a giant pain the butt to do with just the two of us and a couple of sawhorses, but we made it work! Peep the sign in the back. It was kind of ridiculous.        W e mounted the wing so we could check canard incidence. It was bang on! Jeffery also spent a bunch of time on the phone with Chad from the Velocity factory asking various questions. We removed the wing and placed it back on the floor when we were done leveling.        Called it a night. So far Jeffery and I have spent

Verification of Previous Build (Part 5) 8.29.2020

Image
 Part 5 of 526EJ. August 29, 2020     56. Install straws on main gear bushings. Verified. Erik also installed a second straw line to add taxi/landing lights to the gear, which we will probably use.       Skipped down to 60.       60. Install hinges on elevators. Here's some photos of Erik doing this step.                   61. Install hinge arms in canard. Verified they are also there with correct measurements.     62.      63. Install concentric torque tube. Verified. The first photo shows the torque tube had been installed prior to the hinge install.         Called it a night here. We reviewed most of the canard information. Canard still needs weights added and balancing.

Verification of Previous Build (Part 4) 8.28.2020

Image
 Part 4. August 28, 2020     52. Cut out fuselage to allow main gear retract and complete transverse bulkhead installation. Verified. Will swing gear to check travel.     53. Install main gear bushings. These were installed properly.    54. Triax over main gear bushings. This was also done to spec.     55. Permanently install steel bushings in gear legs and make aluminum spacers. Verified.       Skipped to step 131.      131. Install Door hinges. These are installed but on the roof they're not filled yet, we want to fill those before we paint.      132. Install secondary lock in door. Also done.   

Verification of Previous Build (Part 3) 8.27.2020

Image
 Welcome back to Part 3 of 526EJ's build verification.      38. Install seat hardpoints. They are there and the holes for bolts have been drilled.       39. Use Velocipoxy and micro to fair in back of windows. Done. I think this is actually a fastbuild item.     40. Construct sump tank. This is already installed in the back of the fuselage so we also verified step 114. Install sump tank. We found that the sump tank install was missing bolts. We fixed this by drilling holes and adding the second bolts that are specified in the build manual.     41. Glass side of canard bulkhead opposite of the flange. We checked measurements on the fiberglass pieces that were cut. They're there and correct.     42. Install sequence valve assembly. Verified. Will check that it works when we lift the gear.     43. Install dump valve. Verified. Will check that it works when we lift gear.     44. (Verified yesterday)     45. Install hydraulic power pack. (This is a repeat on the flowchart. Was verif

Verification of Previous Build (Part 2) 8.26.2020

Image
Verification log for August 26, 2020.     6. Install wood hard points for control system in keel. This is Erik's photo of the hard point install. They dated the manual 8.15- 8.30 2007 for this part.      7.     8. 9, 10, 11 only applicable for fixed gear kit.    12. Cut out nose gear door hinges. These are fabricated with a template. Ours are currently mounted to the doors, and have obviously been done to spec.      13. Install top Triax pad on firewall for Lycoming engine mount or the lower pads for a Continental engine. Verified they were there but they were slightly undersized for what the manual specifies. Made a note to fix this at a later date.     14. Complete fiberglass portion of nose gear door installation. See picture above.     15.      16. Cut out oil cooler inlet and outlet ducts. Here are some photos from Erik. Oil cooler duct NACA scoop on nose for air intake Inside of NACA scoop      17.     18. Install aileron control bracket to keel in rear section. Erik's ph

Verification of Previous Build (Part 1) 8.25.2020

Image
    Velocity provides a large manual, instructional DVDs, and flowchart for you to follow. The manual is separated into categories such as Bulkheads, Landing Gear, Canard, etc. The provided flowchart allows for a more efficient project as some things need to be completed before others in the manual. We followed the flowchart to verify accurate completion of the steps. This is what we verified for the night of August 25, 2020. We got a late start but all progress is good progress. Erik Stabell did a lot of the build in the Velocity factory under guidance, and I will include photos that were given to us by them.  Note: I'll be skipping over numbers in the flowchart that were not verified at the time, so there may be a few numbers on the next posts that have no text attached to them. Read chapter one of manual and watch DVDs. (Did last night) Cut out doghouse. Verified that this has been done. I also have a photo from the Stabells showing the pilot hole that was drilled for this, as

Fastbuild

    526EJ is a Velocity SE-RG that was purchased with the Fast Build option. Most kit manufacturers have that kind of option. You can either start from scratch for cheaper initial investment or for a bit more the factory will do some of the work for you before you start your own work on it.      The first part of our build process was to go through the manual and read it from cover to cover. Our plan was to then verify that everything the factory and Stabells had marked off as done, was done. Not just done, but done correctly. We were going to go through the plane with a fine tooth comb, make sure bolts were in the correct direction, make sure no fiberglass layups were missing, etc.        The first thing to verify was the Factory Fastbuild portion. This went by rather quickly. We used the Fastbuild "checklist" to reference the sections in the manual that had been accomplished and then stepped through the manual instructions to verify that everything had been done to spec. So

Purchasing the Velocity Kit

Image
     On August 21, 2020 we packed the family in the car and drove to St. Louis to look at a partially completed Velocity SE-RG kit. On August 22, 2020 we saw it, purchased it, and spent the rest of the day exploring the city.  Travis was well worth the money. His trailer is specifically designed for this plane. First the plane is rolled onto the trailer on ramps, then a hydraulic tilts the plane on its side for transportation down the highway. Even with Travis's expertise it took 3.5 hours to load everything onto the trailer         We called the factory about transporting the plane before we went to saw it, and as luck would have it, their go to guy (Travis Holland) was on the way back from California to Florida with an empty trailer, and happened to be passing through St. Louis on Sunday. I kept the kids in the hotel while Jeffery , Travis and his wife, and the Stabells (original owners) loaded up the plane and assorted tools we had been given to go with the plane. Tha