Clean and repair cowls, CHT probes | 12.14.2020 - 12.16.2020
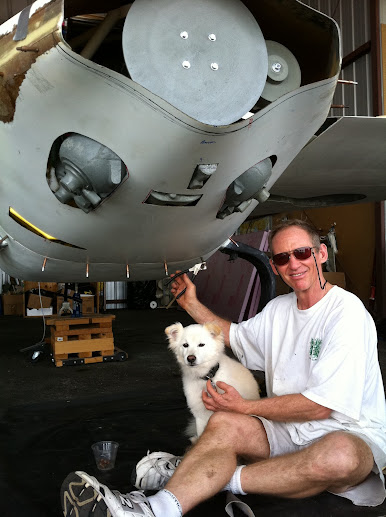
Since the Stabells had planned to install a Deltahawk diesel engine, they were going to need a different cowl. At one point, they had attempted to make the existing cowl work by modifying it to fit. Since they had a mock-up of the engine on a mount, they mounted the engine and cut holes in the bottom cowling to fit the mockup. I assume at some point, they would have glassed in bump outs for the various components.
 |
| Erik with the modified cowl |
Ultimately, they abandoned this idea and fabricated their own custom cowl from scratch, but the original cowl was left with the cutout holes. Since we're using the standard IO-360, the cowl will pretty much fit with minimal need for modification. We'll have to bump a few little things out, but first, we'll need to patch the holes.
First up was removing the adhesive and foam from the cowls. I think they applied the foam to try to use the originals as a mold at some point, but I don't have any pictures to confirm that. We tried everything over the last few months to get this foam off. Eventually, Emily tried some acetone that dissolved the foam somewhat and softened the adhesive. This worked great, and we were able to get the foam off pretty easily.
 |
| Pre-cleaning. Bulk foam had been removed with a scraper to get to this point. |
 |
| Emily cleaning foam. Respirator helps, but doesn't completely filter the acetone. Don't get high, kids. |
Once as clean as it was going to get, I used duct tape to create a "backer" for the glass to lay on from the inside. I made a big duct tape "sheet" on the ground by sticking the duct tape to itself and then cut out pieces slightly bigger than the holes. These were then duct taped over the holes. The fiberglass resin doesn't stick to the duct tape, and once it's cured I can pull it right off.
 |
| Ready for glassing |
I decided to go with carbon fiber for this repair, as I had some and wanted to try it. It's also lighter and somewhat stiffer than fiberglass, so it should help stiffen the back of the cowl where the repair is.
 |
| 2 plies of carbon fiber ready to glass |
Once the carbon fiber was cut, I sanded and prepped the cowl for glassing. The 2 plies of CF was then applied with resin. I tried really hard to monitor this and to keep the resin from draining, but it drained a bit into the center after I thought it was good for the night. I could have used peel ply here to help with the draining, but I was trying to get that glossy "carbon fiber" look.
 |
| Finished product. |
Oh well. Thankfully, the amount that drained is fairly minimal, and the edges where it drained from are still very securely attached. Probably because I over-did it with resin. Lessons learned for next time.
On the 16th, I didn't do much, but did remove the duct tape from the cowl that was backing the layup (since it had cured enough at that point). Once that was done, I mounted the cylinder head temperature (CHT) probes to the engine.
 |
| Probes installed with the stainless/red/yellow wires running from them. |
I also test fit the aileron bellcrank at the end of the wing root to make sure everything would work there, but decided against permanently affixing anything, as this really needs to be done with the wings mounted. That'll be something to wrap up once we transport to the airport.
That's it for now! Thanks for checking it out.
- Jeff
Comments
Post a Comment